Thursday 18 April 2024

THE SOMERTON MAN MYSTERY: THE TORN SLIP WITH MICROCODE REVEALED... #900


...In earlier times numerous articles have been posted here discussing how the letters  TAMAM SHUD contained microwritten letters and numbers which, it seems, are part of a cipher.

TWO CIPHERS

Two ciphers were identified by an online code identifier:

The first was the MORBIT cipher, it was based on a blend of Morse code and standard letters/numerals. We extracted several letters from the Morbit cipher: 'MTBI... NETP ', this was an exciting development as those letters were to be found on the third line of the code page and were in that general sequence.

The second was the NIHILIST cipher a variation of which was in use by the Soviets during WW2 and it also caused some excitement because in the process of attempting to decrypt the strings of information the word or name, MENTIES or possibly MENZIES cropped up. But that was all we have been able to get thus far.

The question arises, how could the letters and numbers be from different ciphers. The answer is that one code was used to cover another, a double encryption. This technique was used in WW2 and was referred to by a recent discussion by a Director of the Bletchley Park Museum when discussing the Pigeon cipher which attracted a lot of attention some years ago. One way of achieving this was to simply write one cipher over the top of another which could be done using different inks for example.

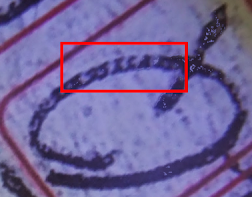
The image at the top of this post shows the presence of numerous letters and numbers which are a little difficult to view but still visible.

Across the crossbar of the T, you can see strings of numbers and letters:

...the numbers are:  5392358535823


Next, we have the upright of the T which is interesting, I see the numbers are written across the upright, from left to right, this makes them very small in size, around .3 mm in height but still very doable:

 ....the numbers are from the top juncture: 45  M53  W34  H33 55 154  X35. 


From there the numbers are arranged in the lower curved element of the T as shown in the next image.
But first, a look at an unusual aspect of the upright contained coded letters/numbers:

In this image of the upright, we have what appears to be a different set of numbers to the set in the previous image, reading left to right.

The characters in the upright now appear to be: 335343950. Told you it was interesting :)  


You can see how the characters overrun the outline of the typeset letter T which is also apparent in the letter as it appears in the phrase TAMAM SHUD:


The image above was printed on an Epson, inkjet printer using quality pigment-based inks. You can see the outlines of the cipher in each of the letters in TAMAM SHUD if you look closely, zooming in does not provide a better view.


Finally, let's look at the curved or 'toe' end at the base of the upright:


The characters in this part of the T are: 91333 as I see them.


SUMMARY

This is just the first of nine letters in the phrase. In the letter T, we have identified 46 characters including the second option set from the upright section.

According to the gurus of the cryptology world, 46 characters are simply not enough to get a meaningful decryption. So this work goes on and the rest of the letters with characters will be published as soon as I get sufficient time.


Share:

Sunday 14 April 2024

THE TAMAM SHUD MYSTERY: DID CARL 'CHARLES' WEBB RUN AWAY TO SEA?.... (Update 1, 2. 3, 4,)


This post has its beginnings, the photograph of a youngish Carl 'Charles' Webb. This image is taken from the larger family and friends group photograph published on the ABC News platform in 2022.

I wondered at the time how a young man from regional Victoria could get such blond hair especially when the earlier image of him in a soccer team photograph showed his hair to be a darker colour?

The immediate thought was a result of spending many hours in bright sunlight. Either that or just maybe he had been at sea, as a merchant seaman perhaps. That led to a search of records for merchant seamen and that in turn led me to the crew list for the SS Golden Sun where I found an Able seaman in 1931 by the name of Carl Webb on the crew list, his date of birth was similar but his height was just 5 feet 8 inches.


I undertook extensive research with numerous communications with US authorities and archives. The result was negative.

Some historical background to this information. In the 1920s which, if proven correct, was when Carl or Charles went to sea, the press was filled with stories and accounts of young men who ran away or went to sea, a great adventure.  The press was not he only influencing factor, the airwaves were filled with sea shanties as gramophone recordings were plentiful.  Going to sea was a definite 'thing' in those years. A search of TROVE using the search term 'ran away to sea' is all it took to confirm a suspicion.

Carl Webb or Charles Webb?

Recently, on reviewing the Carl Webb story, it struck me that I should have also been searching for a 'Charles' Webb, moreover, to be totally objective, the dates I should be searching should include dates after 1948.

Within 20 minutes I came across pages of references to a seaman called 'Charles Webb'. So many in fact that it quickly became obvious that I was more than likely dealing with several different people of that same name and, as it happens of similar birth dates. 

I needed a differentiation, I needed to break that long list by qualifying the entries even further. The simplest way was to look for the names of crewmen who were not registered as American citizens but had their records listed as British or English citizens. In those years, Australians were issued British passports and regarded as British citizens.

Charles Webb a British citizen yielded several results and he had the same year of birth.

Significantly, some of those instances were for voyages that occurred after 1948.

Here are some of the crew lists recently found in rough date order, you will be able to view the progress from beginnings as a pantry hand to an  OS (Ordinary Seaman), AB (Able Seaman), and QM, (Quarter Master)

1. This first Crew List dated 1949 is interesting firstly because it is dated 1949, secondly because it arrived in NY from Venezuela and thirdly because the Charles Webb listed is recorded as being German:


2.  This next list contains the name Charles Webb and is dated 1949 but Charles is noted as a 'failed to show ' seaman:


3.  Dated 1947, a key year, this note is a list of the known races allowed to be employed on US-registered ships. Note that Australia is not included: 


4. Next, the Crewlist of the ship CARMANIA, the interesting feature of this list is that it contains Charles Webb's Seamans Identification card number: 1047141. He is marked down as British. Uncertain about his position though. He was in the right age bracket,  his height was 5 feet 8 inches. Strangely, many of the Charles Webb records I have looked at have the height listed between 5 feet 6 inches and 5 feet 8.5 inches. The year is 1929.


I will upload more later today time permitting.


Does that mean that our Carl 'Charles' Webb took off and went to sea around 1921-22 at the tender age of 16 or so? At this stage, it is a possibility but not a probability.


Share:

Wednesday 10 April 2024

TAMAM SHUD: THE CARL WEBB HEIGHT ISSUE REVIEWED & UPDATED...A surprising set of results..


...This post is a result of reviewing the earlier ones regarding the estimated height of Carl Webb. I had missed an important factor in the calculations, simple as it may sound, I had not made an allowance for the fact that in the family photos of Roy and Carl fo the fact that they had their mouths slightly open. They were in fact smiling.

Odd as it may seem when a person smiles, their mouth opens slightly and the jawline drops measurably. 

In the image of Roy above, you can clearly see that his mouth is firmly closed and his height dimension is based on that fact.

Let's run through the information:

1. His known full height according to the Military record on the NAA site was 5 feet 8.5 inches or 1734 mm.

2. A known dimension in this photograph that we can use is the ruler alongside Roy, it shows his height with markers at 3-inch intervals.

3. For the purposes of this post, I have assumed that the 3-inch divisions are measured between the marked lines and not central to each line.

4. The onscreen measurement for the marked 3-inch division is 7.5 mm thus 1 inch equals 2.5 mm, a ratio of 1 inch to 25 mm or 25.4 mm to 25 mm

5. Roy's on-screen head height is 23 mm which when converted to real size using our ratio is 233.68 mm or 9.2 inches

6 We can now calculate a ratio for Roy's head height to full height by dividing his known recorded full height by the head height as in 1734 mm divided by 233.68 mm, giving us a head to full height ratio of 1:7.42

We can carry Roy's known head dimensions forward into the family 'group of 4' photograph seen below:


There is a fair bit of information on the above photograph so I numbered each point to minimise any confusion

1. By dividing the known head height dimension for Roy, 233.68 mm, and then measuring and dividing the photograph height of Roy's head, 41 mm, I arrived at a ratio of 1:5.7

2. Next I measured Carl's head dimension on the photograph which was 42 mm

3/ I then adjusted the head dimension to allow for the fact that Carl's mouth was open.

4. This meant that to get a more accurate dimension of Carl's head we needed to deduct the 2 mm as shown above. 2 mm doesn't sound a lot but when you use it to calculate Carl's full height, it can add 1 inch or more to his estimated actual height. In this case, our adjusted photograph head measurement for Carl is 40 mm. We can then multiply that by our ratio of 1:5.7 which gives us an adjusted Actual height of Carl's head of  228 mm.

5. The next calculation is based on the assumption that Carl's head height to full height ratio is the same as Roy's which is 1:5.7. The calculation is 228 mm X 7.42 which equals 1691.76 mm or 5 feet 6.5 inches, shorter than Roy by a full 2 inches.

6. The apparent difference in height of 2 inches was a puzzle, it relates to an extent because Carl is standing a little further away from the camera lens than Roy. This is a measurement we do not have and it adds an issue of perspective view. An adjustment of 1.5 inches should be made to account for this difference in height between Carl and Roy This gives us an estimated height for Carl of 5 feet 8 inches. 

A FINAL PHOTOGRAPH

There is one more photograph to examine which is a close-up of Carl in which we can measure an item that we can use to more accurately calculate Carl's full height. The main photograph from which the enlargement of Carl's image is the larger friends and family group taken on the same day as the 'group of 4' Webb family photograph.

The image on the right was deliberately darkened so that the collar outline could be clearly seen.

As in the previous images, there is a fair amount of information in the images.

I have used the estimated length of the collar on Carl's shirt to act as a known dimension from which we can then take measurements of Carl's head dimension and estimate his full height from that point.

1. The image to the right shows the ruler against the length of the collar on Carl's shirt. I researched but was unable to find an exact match to the style of the shirt worn by Carl and Roy, I found one or two similar examples. No dimensions were given so I have estimated the length of the collar based on the width of Carl's shoulders and general appearance. The measurement of the collar was 43 mm which equalled 154 mm actual length of the collar. The scale was 1:3.58

2. Using the collar length as the known object in the image I first measured Carl's right ear at 23 mm which when extended using the scale of 1:3.58 gave an ear height of 82.34 mm or 3.24 inches.

3. Next, I measured Carl's full head height in the photograph, I made an allowance for the fact that Carl was smiling and thus his jawline dropped by 6 mm which was then deducted from the head measurement of 66 mm in the photograph. Finally, using a scale of 1:3.58 calculated earlier, I arrived at an estimated height for Carl of  1718.5 mm or 5 feet 7.5 inches.

SUMMARY

I have used estimates in calculating the dimensions of Carl's head, ear, and full height. These were carefully considered and as the final results show, both examples were within 1 inch of each other, which gives me confidence that this exercise is on the right track. 

Based on this work,  I believe that Carl Webb; was probably no more than 5 feet 8.5 inches in height.

The issue now to be faced is the height of the Somerton Man which was initially put at 5 feet 11 inches but is now thought to be less. From calculations done here in recent posts, he was likely 5 feet 10 inches in height. A discrepancy of just 1.5 inches would need to be accounted for.

Is it possible that somewhere in the exercise, a miscalculation has occurred? I would have to answer yes it's possible but I have also checked and rechecked every step.
Share:

Monday 8 April 2024

TAMAM SHUD. THE SOMERTON MAN MYSTERY IS ABOUT THE CODE AS IT ALWAYS WAS. AN UPDATE AND A MILESTONE…


Firstly, my apologies for the delays, it has been a busy time both personally and in respect of research activities surrounding this blog.

As the headline suggests, the code has been front and centre with interesting new developments. New information and techniques made possible by improved technologies have led to some fascinating insights into the code and its meanings. More soon.

It does not mean that the issue of the identity of the Somerton Man has been left behind, far from it. There will be a time in the not-too-distant future when I will be in a position to reveal more on the latter subject.

For the moment that’s where things are, a Somerton Man code update very shortly and more on his identity in due course.

As for the ‘milestone’, last week and according to Google blog stats, this blog passed through 1 Million page visits since we started here in 2013.

The majority of visitors come from the USA followed by Australia, UK, Germany, France and Russia and so on. 

The audience is from all parts of the world with 80 plus countries listed. More than 70% of the audience are return visitors. 

We get between 500 and 1800 visits a day, for example, so far this month we have been extra busy with more than 7000 visits recorded.  In March we had 34600 visits,

There is increasing interest in particular posts related to the code and to the identity issue.

My sincere thanks to everyone who has visited over the years, your interest and support is greatly appreciated. Without that, the blog simply wouldn’t be here.


Gordon

Share:

Monday 25 March 2024

CAN THIS MAN SHOW US THE TRUE HEIGHT OF THE SOMERTON MAN?


This is a photograph of Professor, later Sir John Burton Cleland, taken at the Adelaide Railway Station while heading off on a field trip in 1934.

In this post, we examine how we might extract information from this photograph and use it to establish a reasonable estimate of the height of Professor Cleland and from that point, establish an estimated height of the Somerton Man.


The thought on how we might achieve the goal of establishing a height from this photograph came from this excerpt from the document known as 'Cleland's notes', I will include a download link for the notes later in this post  I should point out that the notes are not the full copy some parts of it have been removed before it was made available.

Here's the excerpt:

This paragraph tells us that the jacket worn by the Somerton Man on the day his body was found indicates that it fitted Professor Cleland, except for it being tight to button up.

For that jacket to fit Professor Cleland, indicates that both men were the same or very similar height.

KNOWN OBJECT DIMENSIONS

To calculate the sizes of objects or people from within an image, we must have an object or objects of known dimensions within that image. In that regard, this particular photograph has several objects that could fulfill that role.


In this standard-sized image, 8 " X 10" as per the file on SA State Library, I have marked several objects that we can measure and use that photo measurement to calculate the approximate height of Sir John.

In the calculations, the final output variance is +/- 1 inch

Here's the objects list:

From the top:

  • The face height, the known median height of a face as in the point central to the left and right eye to the point of the chin is 120mm.
  • The strap attached to the pouch is estimated at .5 inches in width
  • A wider strap attached to the canvas shoulder bag is estimated to be 1 inch wide. (I measured the two and the narrow strap is one-half the width of the wider one)
  • The binocular case is an unknown dimension
  • The small leather pouch I estimate to be 6 inches wide. ( I used the narrow leather strap to gauge this dimension)
  • To the right of Sir John, we see a luggage ticket attached to the canvas bag, the estimated width is 4.5 inches plus the header element of .5 inches.
  • In Sir John's hand, a second luggage ticket lies flat on the rectangular carry case.
  • The rectangular carry or instrument case is by my estimation and some calculation based on the other objects, 7.5 inches wide by 15 inches deep. ( the width is one-half of the height of the case)
  • I looked at the ladies' shoes as a possibility but the image is not sharp and they are at a slight angle which adds complexity and therefore additional room for error. Similarly for Sir John's shoes.
  • The buttons on Sir John's cardigan and on the sleeve of his jacket need to be more specific for our purpose.
  • With great respect to the late Sir John, you note that he has a middle-age spread, this may explain the issue of the SM jacket being difficult to button.

I have used the instrument case as the base known object.

Median Height information, head height: 225 mm. Full height ratio is 1:8. + - 8 mm

JBC Measured full height on photograph + 208 mm ( Allowance made for shoe heel height)

JBC Measured face height = 15 mm  

The instrument case estimated known object height =15 inches or 381mm The object measured height on the photograph = 45 mm. Ratio 1:8.5. 

Using the instrument case example, JBC full height = 208mm X 8.5 = 1768 mm or 5 Feet 9.5 inches +/- 1 inch.

Share:

Thursday 14 March 2024

CONFIRMATION: 5 Year SCIENTIFIC STUDY CONFIRMS THAT THE RATIO OF HEAD HEIGHT TO FULL HEIGHT IS 1:8, (.14) CARL WEBB CANNOT BE THE SOMERTON MAN...

... VITRUVIAN MAN
&
THE SOMERTON MAN CASE...

THE RATIO's...


;;;Read how this 5 year scientific study of 63375 males and 1375 females proves that the ratio of head height to full height is 1:8 thus proving that Carl Webb cannot be the Somerton Man... (.14:1)

The Vitruvian Man shown above was drawn by Leonardo da Vinci and it was based on the work of Vitruvius 20 BCE, who was the author of De Architectura a 10-volume work with the third volume focusing on body proportions or, as in the case of our recent posts, on ratios.

da Vinci created the Golden Ratio, 1.618 or 'PHI'. Each part of the body in this scheme, the height of the head, for example, is related to the full height of a body in a ratio of 1.618.

A SCIENTIFIC STUDY

A study occurred between 2011 and 2016 at a US Air Force base in San Antonio, Texas and using a 3D body scanner, it measured 63,623 men and 1385 women between the ages of 18 and 21, it was named:

Revisiting Leonardo da Vinci’s Vitruvian Man Using Contemporary Measurements

The study was created by leading academics and, using a 3D body scanner it compared ideal body proportions represented by Da Vinci's Vitruvian Man with contemporary body proportions of young adult men and women, USAF recruits.

The full results are available by the link below, for this post, we will look at one important find. The study found that the ratio between a man's head height and his full height was 1:8. This is the ratio used on this blog to establish that Carl Webb was 5 feet 8 inches tall. Furthermore, the height of the Somerton Man was similarly calculated and he was found to be 1803.2 mm tall or 5 feet 11 inches. Carl Webb was a full 3 inches shorter than the Somerton Man. 

This find substantiates the claim made by this blog yet another reason why Carl Webb could not be the Somerton Man. 

Here's the link to the NCBI website containing more details:

https://www.ncbi.nlm.nih.gov/pmc/articles/PMC7284298/

What happens from here now rests with the SA Coroner, SAPOL, and their Forensics team. There are still numerous questions yet to be answered in the Somerton Man case but this find represents compelling evidence to support the claims made here.

* NOTE. Men's growth period normally ends around 18 years of age but some continue into the 21-year age group.


Share:

Sunday 10 March 2024

THE SOMERTON MAN MYSTERY; CALCULATING THE TRUE HEIGHT OF THE SOMERTON MAN....UPDATE WITH NEW IMAGE AND INFORMATION... April 10th 2024...


...CALCULATING THE TRUE HEIGHT OF THE SOMERTON MAN...


Those familiar with the Somerton Man case will know that his body was measured on the day it was discovered and it was found that he had a height of 5 feet 11 inches.

In this post, the same technique used to calculate Charlie’s height has been applied to the body of the Somerton Man to verify his height based on the photograph you can see above. The photograph shown is from the 1949 inquest, I have added the information on the photograph for those who would like the detail.

HEIGHT CALCULATIONS 

(based on the Researchgate document)

In the image to the right above, I have added a ruler set to measure the height of the man's head.  In this scaled-down image, you can see that the ruler indicates the man's head measures 7 cm from top to chin. By multiplying the head height by 8,  we arrive at the scaled-down full height of the man 70 X 8 = 560mm

The man's head should measure 1/8th of his full height thus to arrive at the man's actual full height we divide the 5 feet 11 inches (1803.4 mm) known height by 8 giving us a head height of 225.45 mm. which by default gives us our full height of 1803.4 mm (5 feet 11 inches)

To calculate the scale for this image we simply divide the actual full height by the scaled-down photograph height as follows:

1803.4 divided by 560 = 3.22 our scale for this image is therefore 1:3.22

This exercise had two purposes, firstly to verify the height of the Somerton Man and secondly, to prove the validity of the Researchgate technique. Both objectives have been met.

UPDATE: April 10th 2024

In the image below you can see that according to the data, SM had an ear height of 73.02 mm. In the latest post dated 10th April, Carl's ear height is shown as being 82.34 mm in height mm in height, more than 9 mm larger than that of the Somerton Man.


Background

The previous post covered the technique with which we could accurately calculate the height of Carl ‘Charlie Webb. This exercise aimed to prove or disprove the claim made by Professor Abbot that the man named ‘Charlie’ in the 'family group of 4' photograph was the ‘Somerton Man’.  The technique relied upon the known height of Roy Webb, Charlie’s brother, obtained from his military service records clearly showed, both written and in a photograph taken at the time that Roy had a height of 5 feet 8 inches. Subsequently, and based on Roy’s height we calculated Charlie’s height which was also put at 5 feet 8 inches +/- 1 inch. That result disproved Professor Abbot’s claim regarding Charlie as the Somerton Man’s height is known to have been 5 feet 11 inches, approximately 3 inches taller than the man Charlie shown in the family group photograph.

Share:

Friday 8 March 2024

THE SOMERTON MAN MYSTERY. CARL WEBB WAS 5 FEET 8 INCHES TALL....THE EVIDENCE... HE CANNOT BE THE SOMERTON MAN...UPDATED 9th MARCH 24


The Carl Webb story has always had a ring of doubt around it, for me at least. 

Something was very wrong about several things including the ear shape not matching that of the Somerton Man and the facial features had the same issue, Carl Webb's face simply does not match the face of the Somerton Man.

Recently I watched a documentary on Aerial reconnaissance from WW2. Specifically, this documentary was about German V2 and V1 rocket sites.  I watched and listened as the movie progressed and the 'mechanics' of the technology were explained.

One aspect was how they calculated the wingspan of a small 'aircraft' on the ground. Via intelligence operatives, they already knew the wingspan of this particular aircraft type, it happened to be a V1 rocket, and that wingspan was 20 feet. The aerial photography showed several objects on the ground and a sharp-eyed WRAF lady picked out a small object, it had an aircraft shape and she was able to calculate the wingspan of 20 feet.

The calculation was made based on the height of the aircraft camera from the ground surface. The term used is 'photogammetry'.

In a way, we are in a similar position with the photograph of the Webb family which includes Roy, Charles, and Grandpa While Grandma is as important as all of them are, we will not include her height details as they're still being determined. However, we do know the height of Roy Webb, 5 feet 8 inches,  and I believe that somewhere we have the height of Grandpa Webb. Carl Webb the man claimed by Professor Abbott to be the Somerton Man, would be, according to the Professor, 5 feet 11 inches tall. This latter measurement applied to Carl Webb which we are about to prove needs to be corrected.

Using Roy Webb's military photograph shown here:


I have actually set for our purposes the datum point as being the top of Roy’s head. This would make Roy closer to 5 feet 8 inches as shown in this photograph. I am using millimeters as the metric.

ROY WEBB METRICS

1. Roy Webb's Height as per this image is 5 feet 8 inches = 1727.2 mm

2. This height was applied to the family image and, as per the photo-reconnaissance example, the height of the object, in this case, Roy's head, was taken and measured on the image, being 52 mm from the top of the head to the point of his chin.

3. The next step is to use the helpful tool found on the Researchgate website that shows how a person's overall height relates to the height of their head which is estimated to be a factor of 8 times head height to full height.:

https://www.researchgate.net/figure/Body-proportions-the-height-of-a-person-is-about-eight-times-his-her-heads-height-the_fig2_224674276

Obviously, the family photograph at the head of this post is much smaller consequently Roy's head measurement of 52 mm needs to be 'scaled' against the actual height such that the 52 mm on the photograph becomes 215.875 mm in reality which gives us a scale of 4.15:1

So, multiplying the 215.875 mm by eight as described in the Researchgate example, we get our 1727.2 mm, Roy's actual height as explained earlier.

CARL WEBB METRICS

 1. Using the same formulae as we did for Roy Webb, we multiply Carl's family photograph head measurement of 52 mm by 8 which equals 416 mm.

2. Next we need to apply the scale factor of 4.15, thus 416 mm X 4.15 which gives us a total of 1726.2 mm (rounded) or 5 feet 8 inches, this is Carl's height based on the family photograph. 

3. This measurement would make Carl the same height as Roy, as in 5 feet 8 inches. There is a question as to whether Carl and Roy are effectively standing next to each other or whether Carl is a little further back than Roy. This is about the distance between the camera and the subject. An allowance should be made for that factor and I suggest .5 to 1 inch in additional height for Carl. That makes Carl 5 feet 9 inches tall.

I am more than happy to accept input on this technique, all that anyone needs to do is to test it. 

Given that the Researchgate method is correct we have shown that Carl Webb was 5 feet 8 inches tall. The Somerton Man was 5 feet 11 inches tall.

This calls into question the claim that Carl Webb was the Somerton Man.


Share:

Wednesday 6 March 2024

THE TAMAM SHUD CASE: AND SO DETECTIVE, WHAT DO YOU THINK HAS HAPPENED HERE?.... A COMPARISON PHOTOGRAPH & MULTIPLE NEW CLUES? UPDATE 2, 7th March 2024

...Facts are powerful. They can change minds, inform decisions, and lead to progress. So, let's focus on the truth - first impressions and just the facts...

In December of 1948, a man was found dead on a South Australian beach not far from the sites of Atomic and other weapons development centers and at a time when the world was teetering on the brink of war again. And in Australia, the future of the country itself was under threat of a Communist-inspired insurrection. A civil war was on the cards. 

This man had no means of identification on him and just a few items including two tickets, one train and one bus, a packet of Army Club cigarettes which contained 7 of the Kensitas brand, a part box of matches, two aluminum combs, a part packet of 'Juicy Fruit' chewing gum and sixpence in coins; labels had been removed from his clothing, and an autopsy revealed that he had been poisoned but the type of poison was never clearly identified. The examining doctor who performed the autopsy made a chart of the man's teeth, it recorded the fact that 18 of his teeth were missing.

And now let's add more facts to this picture. A copy of the Rubaiyat of Omar Khayyam is later found not far from that beach. When the book was examined, indentations on its back page were revealed. The indentations formed the shape of handwritten letters arranged in 5 lines, other markings on the page did not appear to have any particular meaning. The letters were believed to be a code of some kind.

Two telephone numbers were also found on the back page of the book which were written in 'really tiny lettering and under the code' according to a Detective who took part in the original investigation. One of those numbers belonged to a nurse who happened to live minutes away from where the man was found. The same nurse when questioned said that she had given a copy of the Rubaiyat to an Australian Army Lieutenant some 3 years earlier whilst she was employed as a trainee nurse in Sydney. This Army lieutenant was later to agree that he had been in Intelligence during his Army service. 

One last clue is that sometime after the autopsy and before the inquest held into the man's death, a mall piece of paper was found tightly rolled up and pushed well down into a secret fob pocket located on the inside of the waistband of the trousers the man was wearing when he was found. The two words typeset onto this slip of paper were TAMAM SHUD. The shape of this slip which had been torn out of its original page of a copy of the Rubaiyat of Omar Khayyam. was found to match the shape of a torn section in a copy of a book of that title that was handed to the Police by an unnamed local businessman not long before the inquest was held.

You have just read the core facts of the Somerton Man case. Now imagine that you are a seasoned detective who had the experience of serving through the years of World War 2, (this was a time when State Police through their 'Special Branch operations, worked alongside Australia's intelligence services.) Or perhaps you are a Special Branch officer who was in regular contact with the Intelligence services.

What would be your "First thoughts." about these circumstances and facts? What do you think may have taken place? Your first thoughts are important, they are unpolluted by scenarios and theories, and first impressions really count. Now prepare 5 questions you would ask of those involved...

UPDATE: IMAGE ADDED...
A Result...
In the earlier post, we looked at the core evidence in the case, essentially the core facts. I have received a few responses, and one was quite interesting in that it quoted and attached an image from a 1949 article from the 'TRUTH' newspaper. Sadly it doesn't provide a link or a date and a quick search does not show any results for that headline. I am happy to include that here as the article's date could be significant.

Having said that, all is not lost. I followed the link that led me nowhere but I found an article with an image that might contain two new clues.

1.
Here's the image below, let me know if you can spot them:


In the image marked 2 above, I have 'flipped' the photograph of the man in the Truth article and placed it alongside the Somerton Man post-autopsy image to demonstrate a single fact, the fact is that in the Truth image marked '1' immediately above this image, it seems we are actually looking at the Somerton Man's left ear.

In the image marked '2', I have placed it so that you can see the differences that substantiate the claim that we now may have a photograph of the left ear. For this comparison, I carefully placed each image such that various points on the head of both images were properly aligned, and the nose, the chin, and the eyes were lined up and measured.

We can show differences between the left and right ear as you would expect. Most people would know that our ears are often very similar, they are not perfectly matched, as is the case in these images. The differences are as follows:

1. The right ear shown in the autopsy photo, is slightly lower on the head than in the press photo from Truth newspaper.

2. The width of the right ear on the autopsy photo is approximately 3 mm wider at its widest point compared to the Truth photograph which is of the left ear of the Somerton Man.

3. Interestingly, the facial detail of the post-autopsy photograph is noticeably different. That could be the result of the 'reconstructed' image created by Police photographer Jimmy Durham mentioned in the press on December 4th, 1948

4. The bump on the forehead of the post-autopsy photograph is not seen in the press photograph. That could be the result of either, the reconstruction work done by Jimmy Durham or alternatively, it may have been done by the staff at Truth. I noticed that they had given the subject a decent hairstyle.

Once again, here is the photograph I believe to be of the Somerton man taken from the left, showing his left ear. This is the first time this has been shown. It was always there waiting to be found.


The question is, Why is all of this important?

It's important because we can now better compare the Somerton Man's left ear with Carl Webb's.

I need to qualify the claim made here. We are dealing with an old press photograph and, apart from the fact it was published by the Truth newspaper which has something of a chequered history it is a little hazy, I was careful in doing the alignment of the two images to ensure that the sizing and positioning is correct as I could make it.

It is reasonable to assume that there were other photographs taken of the man before Jimmy Durham's reconstruction work and that the photographs shown in the press at the time were the unaltered ones.

I will organise a video showing various ratios and comparisons and post it here when time permits.

Another interesting aspect of this latest research relates to the height of the Somerton Man. Studies suggest that there is a ratio of 1:8 between the head height of a subject and their full height. In the case of the 'Somerton Man' we know that his height on the slab was 5 feet 11 inches. His head height would therefore be 71 inches divided by 8 which would make his head height approximately 8.875 inches. Here is a link to a site with more information on the subject:


https://www.researchgate.net/figure/Body-proportions-the-height-of-a-person-is-about-eight-times-his-her-heads-height-the_fig2_224674276

When it comes to Carl Webb and family photographs, there are some heights known, including Roy Webb and Carl's father. Perhaps someone could take on the task of assessing Carl's height based on his imputed face height?

Share:

Friday 1 March 2024

THE SOMERTON MAN MYSTERY: THE BOXALL RUBAIYAT WAS A SPECIAL PURPOSE BOOK....


.... A SPECIAL PURPOSE BOOK....


Just what is a 'Special Purpose Book'? The simple answer is that this book, widely known as the Boxall Rubaiyat, was made specifically for its purpose and its purpose in this case was to be used as a training aid for those engaged in the business of espionage.

A big statement? Yes, you could say that. But is there any evidence to back it up? And again the answer is 'yes' and you're actually looking at it.

Before the Stuart Littlemore interview, an image of this page from the book showed that the name 'JESTYN' was covered over with a piece of paper and some sticky taoe to hold that paper in place.

At some time after the interview, Alf or someone else removed that paper, and in the process, they tore away a layer from the paper of that page. You can see it quite clearly as outlined in orange.

That can only mean that the paper of the pages in the book was coated, in fact, the core paper had a minute pattern printed on it, if you look closely you will see markings inside the marked area. That pattern got there from special rollers over which the paper was processed and which left those marks. The next step in the process is to apply the coating. This was made from either a wax or an adhesive of some kind. It provided a degree of water resistance and added strength/ toughness to the pages. 

The paper was in fact what is known today as a 'security' paper. In the war years, it was used extensively for in-the-field message pads, carrier pigeon notes, etc. It had an added benefit in that the background 'water markings' served to obscure to an extent any hidden writings or indentations on the paper.

As far as I can ascertain, security paper was not used for normal book production during WW2. As it happens, I have a copy of the same edition of the Rubaiyat, and the paper is definitely not coated. Coated paper is smoother and less porous, not necessarily glossy, my copy is quite rough due I think to the significant paper shortages in the war years.

Here's an unmarked version of the Jestyn signature shown at the head of this post:


I have darkened this image to provide some contrast and make viewing the torn area and the markings within it that much easier.


Share:

Wednesday 28 February 2024

SOMERTON MAN MYSTERY TAMAM SHUDL VENONA, ENORMOZ (MANHATTAN PROJECT) AND PAVEL FEDOSIMOV

 ...FEDOSIMOV (MAJ) NAMED IN HIGH LEVEL
CONTACT WITH ATOM SPIES...


Reviewing the posts that covered the man PAVEL IVANOVICH FEDOSIMOV a New York-based Soviet Diplomat who was to disappear in August 1948, I came across this VENONA cable dated 12th November 1944. This casts Fedosimov in an entirely different light, here he is in discussions regarding THEODORE HALL  the young spy who is regarded as the key figure in the ATOM SPYstory even though he was just 19 years of age.

If you follow on from the Fedosimov mention, you will see a cover name BEK. This is a man known as Sergey Kurnakov aka Sergei N. Kournakoff. A one-time Tsarist Cavalry officer, Kurnakof relocated to the USA and became a prominent figure in the American Communist Party, at one time working for GOLOS Publishing. For those who have read on the subject, GOLOS was known as a 'shoemaker' that is someone who had great expertise in forging identity documents. Golos supposedly died in 1943 but there is a question mark over that event. His name appears in one of the partial decrypts of the Somerton Man code page,


You can read more details here: 


The Fedosimov story has been covered at length on this blog, he disappeared in August 1948 never to be seen again although his name cropped up numerous times after that date, there have been no photographs found of this man after the 1947 image I was able to locate and purchase.

For the record, renowned US author and historian James Earle Haynes believed that FEDOSIMOV may be a Pseudonym. 


Given the serious doubts about the Carl Webb claim, Fedosimov is still a candidate but there are other reasons for posting this article at this time.

This link will take you to more posts about Pavel Fedosimov:


The image of the VENONA cable comes from this YouTube video:


Some wise and very informed words from UK Author NIGEL WEST in the video...

Share:

Sunday 25 February 2024

SOMERTON MAN: A 'PRECIOUS TRUTH'?


..Apart from this famous gesture (which he apparently made by mistake when this photo was taken), Churchill was renowned for his sharp wit and great quotes. The quote in question today is regarding Truth..

"In wartime, truth is so precious that she should always be attended by a bodyguard of lies."

For those who believe that Australia and other countries were not at 'war' in 1948, perhaps you would do well to rethink that position.

The war was very much a Cold War, a full-on arms race coupled with an intelligence war without parallel in those years and, in Australia at least, rumblings of an insurrection organised, coordinated, and paid for by the Soviets in league with the Communist Party Of Australia.

There were casualties, many died in this war, mostly discretely and without fanfare, a Spy Versus Spy affair that went on for some years.

Those who have spent any time reading through the Milliers Hat, the story that it is said gave Ian Flen=ming the idea for Operation Mincemeat, could draw some but not that many parallels with that operation and the case of the Somerton Man. The relatively recently released files by UK Archives provide quite some detail but sadly it is not a digitised offering.

Amongst things that we may learn from it include the comparative ease in which a Coroner and a pathologist were drawn in to 'help' with the provision of a body and all that that entailed, the meticulous attention to detail in setting up the documentation that was to accompany Glyndwr on his final journey was astounding, the work was so good that the case didn't have a hint of being an organised 'litter' job. 


In common were the two bus tickets, the matches, the cigarettes, and small change we can tick off. No watch for our Somerton Man nor a Love Letter from a lady named Pam. But the essentials were there except the missing soap and a flannel.

A comment was made about the condition of the body after it had been kept on ice for around 3 months, apparently, there were several power cuts and thus there would have been defrosting and refreezing that would have had an effect on the condition of the body which was meant to have been so bad that rumours spread amongst those in the know that the body was swapped at the last minute. That raises the question brought up in an earlier post as to whether or not there were power cuts that would have affected the condition of the body of the Somerton Man during its stay at the morgue.

One story is that Glyndwr's sister turned up to claim the body, her story was that Glyndwr had been mentally ill for some time. Shades of Paul Lawson's thoughts on the Kangaroo Island connection and the SS Warrawee, the Captain of that ship was a certain Captain Harkness I understand,

What can we get from this example? The involvement of officialdom during the war years, the clever and well-thought-out creation of the cover story including the pocket and suitcase litter. An unknown/undetectable cause of death, in Glyndwr's case he had taken rat poison which, according to accounts would be hard to detect in the body after death.

Having spent some years studying the SM case and having read widely on the subject added to my own earlier Police experience, whatever actions the Police may or may not have taken were planned actions. They had a job to do and they did it without question. Bear in mind that these men who were involved in the case had just come through WW2 and their job was to be the front line for Intelligence services who were well truly stretched in those years. It's well and good for the armchair gurus to make their rather unpleasant and often nasty comments about these men, but these same gurus were not there at the time and do not speak from experience. Relatives and descendants of these men read the blogs and we all should respect their feelings.

A last thought, Cholmondeley, a senior member of the XX team, remained in SOE until retirement in 1962. No doubt his expertise would have been called on whenever a body was to be used.


Share:

Monday 19 February 2024

THE SOMERTON MAN TAMAM SHUD : THE MICROCODE BREAKTHROUGH, AS SIMPLE AS IT CAN BE...UPDATED…


...CONCEALED MICROCODE REVEALED
SIMPLY AND EFFECTIVELY...
READ ON...


Believe it or not, the microcode is hidden in the above image...

This year marks 14 years of involvement in the Somerton Man case. The first 2 years plus were spent on the original Adelaide University Facebook page. It was during that time that the whole microcode issue came to the surface and I spent much time attempting to convince Professor Abbot and others of its existence, which was a pointless exercise based on the level of ignorance and inability to see past their preconceived ideas on the nature of the case. In other words, what I had found would upset the applecart and their agenda would be undermined. Welcome to the real world.

Don't get me wrong here this post is not about calling the detractors and nay-sayers stupid or ignorant, I really don't have time for that. The purpose today is to show everyone just how simple it now is to uncover concealed microcode from beneath printer ink. In fact, all that is needed is to be found at the foot of this post...

In the image at the head of this page, there are 5 listed instances where the microcode may be hidden, if it's there it will be beneath one or more of the blue lines that you can see. the question is, is it there?

Yes, it is there and here it is for you to view at your leisure:


The image above is the negative of the image in the header at the top of this page. Four of the numbered instances have short descriptions alongside them, the line numbered 2. is the one with the question mark, it does not give a description for a specific reason.

Here's the negative of the result from one of the other printers in which I used a yellow coloured mark over:


here are the individual images shown as black'white and also black yellow to make it easier to see the darker written characters:

1.  This image below shows the microcode as 'INK OVER PENCIL'. The code was handwritten in pencil and then covered with a layer of ink. you can see the code in a grey colour within the marked area. It is confusing at first but once you see it as grey it is easy to see, you can't unsee it. The numbers are 123419 :


2. The trap! There is a question mark alongside this marked-over area because there is no code beneath it. This was done to demonstrate that whilst you might see darker patches, you need clear definable shapes as in letters and/or numbers to confirm the presence of code and those characters need to follow the shape of the mark over:


3. In this image the example is of an inked-over area with the code written in pencil on top of the ink, hence 'PENCIL ON INK'. Once again the characters that you're looking for are those in a light grey against the white background being X 12365:


4. In marked area 4, you can see that we have created typical INK H concealment, a sandwich if you like. First, a layer of ink is applied then the code is added in pencil and then, to minimise the risk of detection from a bright light for example. another layer of ink is added to complete the concealment hence the label INK/PENCIL/INK.  Interestingly, the additional layer of ink gives the code letters and numbers a 3D appearance, 123 XCA:


5. In this final example the format is INK ON INK. A little more difficult to find but it can be detected with more effort, in this case, we at least can see some discernible shapes that tell us that there is something there but just what it is, is the issue. I know what it is simply because I put it there but you will have to try and guess it at least for now. In practice, another recovery method is used. A clue for you, the previous examples are of pencil on ink whereas in this example we have INK ON INK...


To carry out and complete this test, I used inkjet printers, 3 of them in fact. two were loaded with pigment-based inks whilst one had a black pigment ink and then dye-based colours. All three are Epson models with one, an XP970, being used for quality photographs and the other two used for office and business tasks. In other words, these are standard inkjet printers. The other components needed are a decent camera and bright sunlight. And that's it. Couldn't be simpler. Over the years camera and printer technologies have leapt ahead and that has made this task so much easier that even a child could do it.

To test the example for yourself, you could download the image at the head of this post and then turn it negative. If you don't have the facility to do that then several online tools will turn an image negative for you and for free.

Here's one:

When you get there, scroll down the column to the left and choose 'invert colours' you can download the result from that page.

Share:

ABOUT US and OUR RECORD

Learn more about, when the blog started our location plus a long list of 'finds' and new evidence discovered by this blog